sdaos About Posts

HTTP Requests and Selenium

June 22, 2023 · 10 minute read

Introduction

Web browsers serve as the predominant medium for conducting a wide range of our digital activities. They allow us to engage in numerous activities, including e-commerce, communication, entertainment, productivity, and more. However, a significant portion of our web-based activites involve repetitive tasks that can be automated. For instance, the process of data collection can be acheived through techniques such as web scraping.
The two primary approaches that I'll be covering to automate the web are: BeautifulSoup in tandem with requests for general data collection and web scraping; and Selenium for more intricate projects that required increased interaction with web forms and dynamic elements.
Web scraping, employed with HTTP requests and BeautifulSoup, offers a remarkably straightforward and easy approach. However, Selenium allows users to engage in more complex interactions with websites.
When making the determination of which method to employ, it is important to select the proper tool. If your objective is to solely extract data from websites, HTTP requests in combination with BeautifulSoup will oftentimes suffice. On the other hand, if your requirements necessitate a greater degree of website interation, Selenium is the recommended choice as it allows for dynamic element handling, and executing complex interactions.

HTTP Requests

The fundamental process of web scraping can be delineated as follows: Initially, we import the essential modules requests and BeautifulSoup. Subsequently, we proceed to construct the appropriate GET URL as well as request headers which are then dispatched to the designated web server. Following the successful retrieval of the server's response, we can use BeautifulSoup to parse the HTML content and extract the desired data points.
To illustrate, let's walk through the development process of a program specifically designed to scrape Facebook Marketplace for a targeted query. This will serve as an example of how web scraping can be implemented for extracting information.

I. Import Dependencies

This section should be fairly self-explanatory. We begin by importing the required modules. Requests to send the GET request to the targeted web server, and BeautifulSoup to parse the HTML DOM.
import requests from bs4 import BeautifulSoup

II. GET URL & Request Headers

In this section we focus on constructing theGET URL with the appropriate query parameters, as well as creating valid request headers to send to the target server. In most cases, you can easily append query parameters, denoted by a question mark in the url, to specify your targets. As for request headers, they are a part of the HTTP protocol and contain additional metadata information that is sent by the client to the server. This information provides information to the server and allows it to process the request correctly.
In most cases, crafting the GET URL is extremely easy. An example can be seen below. In this case we are simply appending our query to facebook marketplace at the end of the URL.
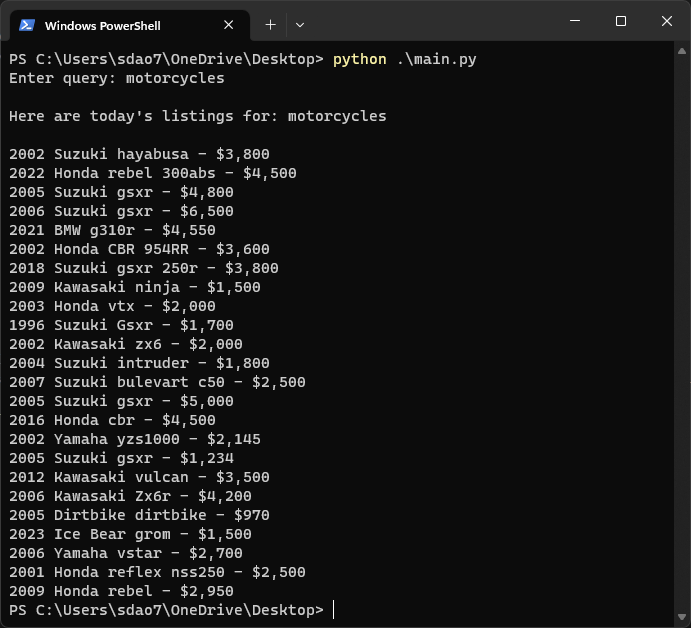
query = input("Enter query: ") url = "https://www.facebook.com/marketplace/104052009631991/search/?query={0}".format(query)
NOTE: One of the hardest parts in this process is crafting valid request headers. This is due to the fact that most websites employ measures to impede web scraping activities and bot access. In order to bypass these protective mechanisms, we need to employ request headers that mimic regular users.
One of the best ways to craft request headers is by ripping them straight out of your own web browser. This can be done through network consoles found in most web browsers. An example of this can be seen on the right. One of the most effective ways for crafting valid request headers is to rip them straight from your own web browser. This can be done by using the network consoles available in most web browsers. These consoles enable you to analyze network traffic between your browser, allowing you to observe the actual headers being sent.
Among the various request headers, two particularly important ones are Accept-Encoding and Accept.
Accept-Encoding informs the server about acceptable encoding schemes that the client can handle for the response content. Having invalid values for this header may result in unreadable or malformed data from the server.
Accept indicates the content types or media types that the client is capable of understanding or processing. Typically for web scraping purposes this will be "application/json" or "text/html".
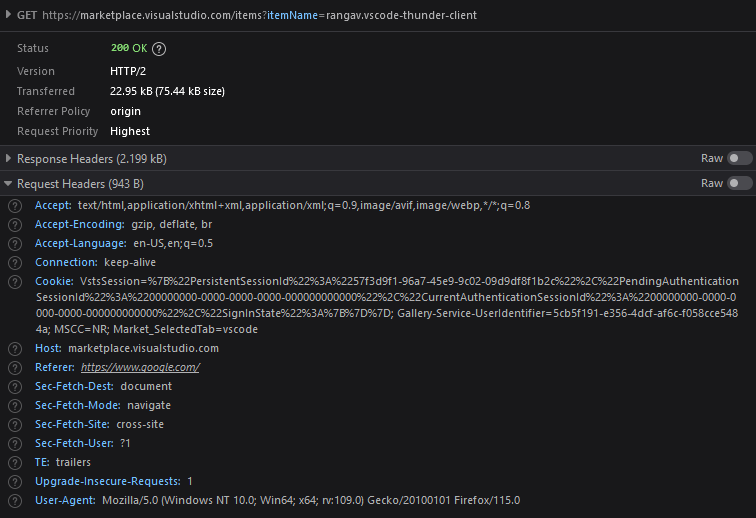
example request headers
Below is an example of valid request headers that I ripped out of my firefox browser, to emulate an end user.
headersList = { "Host": "www.facebook.com", "User-Agent": "Mozilla/5.0 (Windows NT 10.0; Win64; x64; rv:109.0) Gecko/20100101 Firefox/114.0", "Accept": "text/html,application/xhtml+xml,application/xml;q=0.9,image/avif,image/webp,*/*;q=0.8", "Accept-Language": "en-US,en;q=0.5", "Alt-Used": "www.facebook.com", "Connection": "keep-alive", "Upgrade-Insecure-Requests": "1", "Sec-Fetch-Dest": "document", "Sec-Fetch-Mode": "navigate", "Sec-Fetch-Site": "none", "Sec-Fetch-User": "?1", "TE": "trailers" }

III. Parsing HTML

In the final step, we pass the HTML DOM through BeautifulSoup's HTML parser. In this scenario, we send the GET request to the URL, and receive the HTML DOM as an attribute of the object. Specifically response.text.
response = requests.get(url, headers=headersList) soup = BeautifulSoup(response.text, 'html.parser')
Once the HTML DOM has been parsed, we can begin scrubbing the DOM tree for the desired data. This entails using BeautifulSoup's selection elements to search for specific elements based on tags, attributes, or other criteria.
BeautifulSoup contains methods such as find() and find_all() to help you extract data. More documentation on methods available to select elements can be found on the official documentation page.
In the example below, we use BeautifulSoup to find all span elements with the class: x1lliihq x6ikm8r x10wlt62 x1n2onr6. This is because all span elements with this class contain the names of listings on the marketplace.
# Extracting data using BeautifulSoup's methods #desired_data = soup.find_all('tag', class_='class_name') names = soup.find_all("span", class_="x1lliihq x6ikm8r x10wlt62 x1n2onr6") price = soup.find_all("span", class_="x193iq5w xeuugli x13faqbe x1vvkbs x1xmvt09 x1lliihq x1s928wv xhkezso x1gmr53x x1cpjm7i x1fgarty x1943h6x xudqn12 x676frb x1lkfr7t x1lbecb7 x1s688f xzsf02u")
The last step in the web scraping process involves enumerating the data and elements we found.
for i in range(len(names)): print("{0} - {1}".format(names[i].text, price[i].text))
Below you can find an example showcasing how Python extracted data from Facebook Marketplace.
picture of facebook marketplace results
picture of data being scrapped
It's important to remember that navigating the web revolve around the fundamental exchange of HTTP requests and responses between clients and web servers. By understanding this, we can analyze HTTP requests to automate web processes.

Selenium

Selenium is a popular open-source framework that enables automated web browser interactions. With Selenium, developers can write scripts in various programming languages (such as Python, Java, or C#) to automate web actions like clicking buttons, filling forms, navigating pages, and extracting data.
Selenium is predominantly employed in more complex scripts that necessitate user interactions with websites, as opposed to the more straightforward usage of HTTP requests. Through selenium, developers can create scripts that surpass the limitations of simple data retrieval accomplished via HTTP requests.

I. Getting Started

Before proceeding, we first need to set up the necessary dependencies in our environment. Here is a quick start guide on setting up these dependencies.
First we begin with installing all the required modules. This can be done with pip as illustrated below.
pip install selenium
Secondly we need to choose the web driver of choice. In this case we will be using chromium. There are two ways to set up the chrome binary.
1. Manually: Download the Chrome Driver binary from the download page. And choose the appropriate version of Chrome Driver that matches your Chrome browser version. After, we set up the Chrome Driver binary path in your code. import selenium driver = selenium.webdriver.Chrome(executable_path='path/to/chromedriver')
2. Automatically (Recommended): The recommended approach to setting up the Chrome Driver binary is by utilizing the python module webdriver_manager. THis module simplifies the process by automatically managing the installation and setup of the Chrome Driver binary.
We can first install webdriver_manager using pip:
pip install webdriver_manager
Then we can import the classes and set up the Chrome Driver binary.
import selenium from webdriver_manager.chrome import ChromeDriverManager driver = selenium.webdriver.Chrome(service=selenium.webdriver.chrome.service.Service(executable_path=ChromeDriverManager().install()), options=options)
Once our environment is setup, we can start navigating to websites by using driver.get(targeted_url). Below is an example code snippet of searching google for the query, famous inventors.
import selenium from webdriver_manager.chrome import ChromeDriverManager from selenium.webdriver.support.wait import WebDriverWait from selenium.webdriver.support import expected_conditions from selenium.webdriver.common.by import By from selenium.webdriver.support.select import Select driver = selenium.webdriver.Chrome(service=selenium.webdriver.chrome.service.Service(executable_path=ChromeDriverManager().install()), options=options) driver.get('www.google.com') searchBar = driver.find_element(By.ID, "APjFqb") submit = driver.find_element(By.NAME, "btnK") searchBar.send_keys("famous inventors") submit.click()

II. Selecting Elements

The core of Selenium is selecting elements and interacting with them on the webpage. As a result, it is important to be able to reliably and accurately select elements. Selenium offers a myriad of functions to select elements based off of various attributes such as ID, class, name, XPATH, and CSS Selectors. Here are a couple of the selection methods offered:
#Available selection methods ID: element = driver.find_element(By.ID, "element_id") CLASS: element = driver.find_element(By.CLASS_NAME, "element_class") NAME: element = driver.find_element(By.NAME, "element_name") TAG: element = driver.find_element(By.TAG_NAME, "tag name ie: span") XPATH: element = driver.find_element(By.XPATH, "absolute or relative xpath")
NOTE: XPATH should be a fallback option that should be used in last-ditch scenarios since any modifications to the website's structure can potentially invalidate the XPATH expression, leading to the breakdown of the program.
In certain niche cases, an issue that may arise is attempting to select an element inside an iframe without first switching to that particular iframe. In this case, Selenium will throw an "Element not found" exception since it does not know to look inside of the iframe.
To solve this issue simply switch Selenium to operate within the iframe before attempting to select elements within it. Here's an example of how to switch to an iframe
driver.switch_to.frame(iframe_element)

Explicit & Implicit Waits

During the loading of a web page, the elements will load at varying time intervals. As a result, if these elements are not immediately available in the DOM then Selenium will raise a ElementNotVisibleException.
Selenium offers a solution by enabling developers to first wait for elements to load or become interactable before further code is executed. This ensures that elements are present and accessible, preventing exceptions.
There are two types of waits available in Selenium, explicit and implicit waits.
1. Explicit Waits: Explicits waits allow you to define specific conditions before executing any further code. These conditions can be based on element presence, interactability, visibility, or more. Explicit waits allow users to set targeted timeouts allowing Selenium to dynamically pause the execution until specificed conditions are met, optimizing test execution.
2. Implicit Waits: Implicit waits allow you you to wait for a specified duration before triggering an exception. The wait duration is automatically applied before each element interaction, giving elements more time to properly load in.
WARNING: Do NOT mix explicit and implicit waits. Doing so can cause unpredictable wait times.
Below are some examples of explicit and implicit wait conditions:
import selenium from webdriver_manager.chrome import ChromeDriverManager from selenium.webdriver.support.wait import WebDriverWait from selenium.webdriver.support import expected_conditions from selenium.webdriver.common.by import By from selenium.webdriver.support.select import Select driver = selenium.webdriver.Chrome(service=selenium.webdriver.chrome.service.Service(executable_path=ChromeDriverManager().install())) driver.get(URL) #Explicitly wait Wait for the button to be clickable for a maximum of 10 seconds button = WebDriverWait(driver, DURATION).until(expected_conditions.element_to_be_clickable((By.ID, "elementID"))) button = drvier.find_element(By.ID, "elementID") button.click() driver.quit() import selenium driver = selenium.webdriver.Chrome(service=selenium.webdriver.chrome.service.Service(executable_path=ChromeDriverManager().install())) driver.get(URL) #Set the implicit wait to ten seconds driver.implicitly_wait(10) button = driver.find_element(By.ID, "elementID") button.click() driver.quit()
Explicit and implicit waits are used to handle synchronization issues that can arise when interacting with elemes on a page. This ensures that programs wait for certain conditions to be met before proceeding with the next steps. Best practice dictates that explicit waits are used over implicit waits whenever possible, since they are more efficient and provide for better control. This allows for improved stability and reliability of the program.