A common challenge faced by numerous organizations is the efficient inventorying and auditing of assets. While there is always the option of manually tracking asset information on a spreadsheet, this approach quickly becomes increasingly unmanageable as the number of assets expands. Furthermore, the reliance on user input exponentially increases the likelihood of errors as manual entry of information is prone to human mistake.
The Solution
The solution is simpler than anticipated. In a Windows environment we can use PowerShell; a powerful, lightweight, and robust programming language that can automate repetitive tasks, such as collecting data. By utilizing PowerShell, we can effectively and reliably collect computer information from both local and remote clients with precision.
Using SnipeIT and its API, we can combine all these components to develop a comprehensive program that fully automates the asset inventorying process. In essence, PowerShell serves as the means to collect and format computer information accurately, while an API facilitates the creation, updating, and management of assets within a database system.
Once the core functionality of the program has been designed and implemented, the next step is to incorporate comprehensive error handling to ensure a pleasant and seamless user experience. This enhances the reliability and usability of the program, reducing the likelihood of user errors.
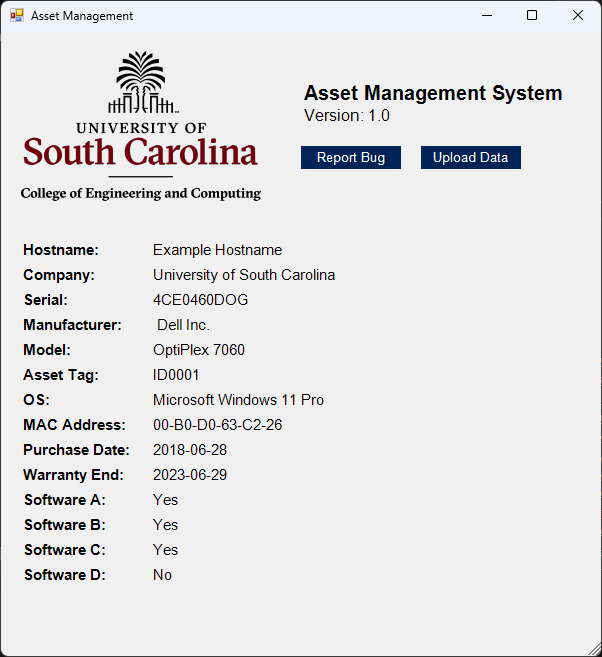
In the final phase, we can improve usability by encapsulating the program within a graphical user interface and compiling the program to a lightweight and portable executable. By providing a visual interface, users can interact with the program more intuitively, leading to enhanced accessibility. By compiling the program, we can effortlessly distribute the program, and ensure cross-compatibility across all systems.
Once complete, the program may look a little something like this.
Code Overview
As mentioned in The Solution, the code workflow encompasses two major phases. Phase one involves aggregating computer information and formatting it into the appropriate structure. In phase two, an API will be utilized to establish communication with the target system and upload the corresponding data. Once these two functions have been implemented, the remaining tasks include implementing robust error handling mechanisms, creating an intuitive graphical user interface, and ultimately compiling the program to a lightweight and portable executable.
I - Data Aggregation
During this first initial phase, we begin with creating a custom PowerShell object. Once this object is created, we can add custom attributes and their respective values to them, allowing us to consolidate all relevant information into a single object, facilitating efficient data collection. It is important to note that data collected during this phase is entirely customizable according to the requirements or specifications of your organization.
PowerShell natively contains an extensive array of built-in functions capable of effectively retrieving whatever information you desire. These functions enable you to access various system details that you will require for your data collection process. These tools are Windows Management Instrumentation (WMI) and Get-CimInstance.
With WMI, you can retrieve a wide range of data related to hardware, software, network configurations, and other aspects of the operating system.
Get-CimInstance enables you to query the Common Information Model (CIM) and retrieve data from the management infrastructure of the local or remote computer.
Below is a simplified example function that demonstrates how you can collect data using PowerShell:
#Main function to collect and display computer information
function Get-ComputerInformation {
    [CmdletBinding()]
    Param()
    Process {
        function Get-Memory {
            $memory = Get-WmiObject Win32_PhysicalMemory | Measure-Object -Property Capacity -Sum | Select-Object -ExpandProperty Sum
            $memoryGB = [math]::Round($memory / 1GB, 2)
            return $memoryGB
        }
        function Get-Disk {
            $disk = Get-WmiObject Win32_LogicalDisk | Where-Object { $_.DriveType -eq 3 } | Select-Object DeviceID, Size, FreeSpace
            return $disk
        }
        function Get-Processor {
            $processor = Get-WmiObject Win32_Processor | Select-Object Name, Manufacturer, NumberOfCores
            return $processor
        }
        function Get-MAC {
            $mac = (Get-WmiObject win32_networkadapterconfiguration | Where-Object{$_.IpEnabled -match "True"})
            if($mac.MacAddres.Count -eq 1) {
                return $mac.MacAddress
            }
            else{
                return $mac.MacAddress[0]
            }
        }

        #Initialize variables, invoke functions
        $memory = Get-Memory
        $disk = Get-Disk
        $processor = Get-Processor
        $mac = Get-MAC

        #Create custom powershell object
        $pcinfo = New-Object -TypeName PSCustomObject
        $pcinfo | Add-Member -NotePropertyName "Memory" -NotePropertyValue $memory
        $pcinfo | Add-Member -NotePropertyName "Disk" -NotePropertyValue $disk
        $pcinfo | Add-Member -NotePropertyName "Processor" -NotePropertyValue $processor
        $pcinfo | Add-Member -NotePropertyName "MAC" -NotePropertyValue $mac

        return $pcinfo
    }
}
The implementation of this phase WILL vary significantly across different organizations; however, the overarching objective remains straightforward: consolidating all desired data to be stored in a unified custom PowerShell object. You have the flexibility to design that data collection process to be as simple or as elaborate as necessary. It can involve retrieving basic system information or delving into more advanced details, depending on the depth of data analysis required for your system.
For effective debugging and troubleshooting purposes, it is advised that you encapsulate the commands used to retrieve data within functions. By encapsulating data retrieval commands within functions, you can isolate and modularize specific data collection tasks. Furthermore, it becomes significantly easier to create unit tests. Unit tests are essential for ensuring the accuracy and reliability of your code by validating individual functions or components.
It is important to note that in most cases, parsing the return values from these functions is necessary to precisely match database values. Depending on the API being utilized, failing to match these values precisely results in either a rejection of the JSON payload, or the presence of malformed data.
In this case and in the following examples, we will be working with SnipeIT JSON REST API. SnipeIT API accepts JSON-formatted payloads and communicates through standard HTTP requests.
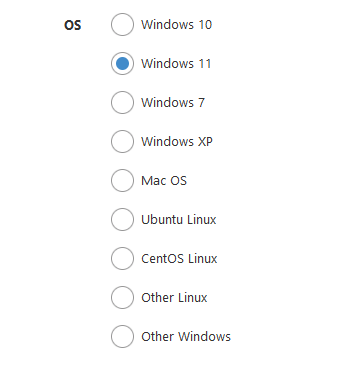
To illustrate this issue let’s explore the process of retrieving data for a commonly used asset statistic, the operating system. The operating system can be easily retrieved using PowerShell through the following code snippet.
On the right-hand side are the acceptable input fields for the operating system field in our SnipeIT database system. Note the disparity between the output of the command and the approved input options.
This approach is employed because, as administrators, our primary concern lies in the major version of the operating system rather than the specific details of the build. For instance, the distinction between LTSC or ENT is insignificant. What matters is identifying a PC as a Windows-based system with a major build such as 11 or 10.
Therefore, we need to parse the output of PowerShell and modify it to align with acceptable input fields.
Pseudocode for this process would look something like this:
function Get-OperatingSystem {
    [CmdletBinding()]
    Param()
    Process {
        $os = (Get-WmiObject -Class Win32_OperatingSystem).Caption
        return $os
    }
}

$os = Get-OperatingSystem
OUTPUT:
"Microsoft Windows 11 Enterprise"
Operating System Function
It is worth noting that when designing these data collection functions, a recommended approach is to design them solely as local functions, as opposed to complicating the function by accounting for remote machines. For example, using the $using:variable to save local variables on remote machines.
Designing these functions as local functions reduces complexity in situations where information needs to be collected from both local and remote computers. In the case the target is a remote computer, the local function can simply be invoked against the remote machine to gather the required data. This can be done with the Invoke-Command cmdlet. Alternatively, if the program is intended to target the local computer instead of a remote machine, the function can be directly called without the need of the Invoke-Command cmdlet.
Pseudocode for this process will look something like this:
function Get-ComputerInformation {
    [CmdletBinding()]
    Param()
    Process{
        function Get-Memory {
            $memory = Get-WmiObject Win32_PhysicalMemory | Measure-Object -Property Capacity -Sum | Select-Object -ExpandProperty Sum
            $memoryGB = [math]::Round($memory / 1GB, 2)
            return $memoryGB
        }
        #More data collection functions
        #....
        $systemData = [PSCustomObject]@{
            ComputerName = $env:COMPUTERNAME
            Model = Get-Model
            Mac = Get-Mac
            Memory = (Get-CimInstance Win32_ComputerSystem).TotalPhysicalMemory
            DiskSpace = (Get-CimInstance Win32_LogicalDisk -Filter "DeviceID = 'C:'").Size
            #More data collection functions...
        }
        return $systemData
    }
}

#If the target's hostname is the local hostname
if($target -like $env:COMPUTERNAME) {
    $sysinfo = Get-ComputerInformation
}
#Otherwise if computer is remote
else{
    $sysinfo = Invoke-Command -ComputerName $target -Scriptblock ${Function:Get-ComputerInformation}
}
In scenarios where you need to provide parameters to the Invoke-Command cmdlet, you can utilize the native -ArgumentList handle. This allows you to pass arguments to the command being invoked remotely. Once you have completed crafting all data retrieval functions, ensured accuracy and reliability through unit testing, and consolidated them within a custom PowerShell object, you can then proceed to the next phase in this process.
II - Data Transfer
The subsequent step in the process involves parsing the retrieved data into a valid payload format that conforms to the requirements of the API. This step ensures that the data can be successfully transmitted and accepted by the API for further processing. The specific requirements and formatting may vary across different APIs; however, they generally share common components.
Most APIs require authentication, typically through API keys or some form of authorization mechanism. Keep in mind that every call to the API requires a Bearer token authorization in the header. The Bearer token is the API key preceded by the word “Bearer”.
Communication with the API is typically facilitated through HTTP requests, such as GET, POST, PUT, or DELETE to transmit data to and receive data from the server. The data exchanged typically follows a structured format, such as JSON or XML, based on the API’s specifications. To ensure successful integration, refer to your API’s documentation regarding authentication and payload format.
Below is an example of a structured GET request to an API in PowerShell.
$headers=@{}
$headers.Add("accept", "application/json")
$headers.Add("Authorization", "Bearer $apiKey")
$response = Invoke-WebRequest -Uri 'https://develop.snipeitapp.com/api/v1/hardware' -Method GET -Headers $headers
$data = $response | ConvertFrom-Json
In most environments and API scenarios, it may be necessary to first perform a preliminary search to first determine whether the target exists.
The term “target” in this context refers to the specific element or entity you aim to focus on and manipulate within the system. To illustrate, if you are attempting to create a new model in the system, then the target would be all models. If you are attempting to create a new asset in the system, then the target would be all assets.
Identifying the existence of the target in the system is important, as it dictates usage of the proper HTTP request method and acts as a deterrent against duplicate assets in your database system. It is recommended that when you query the system for the target, you use a unique identifier, such as a serial number, to ensure that the search query precisely matches the specific asset you are interested in and reduces the amount of parsing you must do against the return value.
In an ideal environment, when querying the asset management system for an asset or model, the system should consistently return precisely one result, confirming the accuracy of the queried information. However, in most cases, this scenario is not possible and additional parsing of the data is necessary.
Here is an example of how you can determine whether the target exists using an API. Note that this code snippet can be modified to target any values per your requirements.
[Uri]$searchUrl = "[QUERY PARAMETER]"
$headers = @{}
$headers.Add("Accept", "application/json")
$headers.Add("Content-Type", "application/json")
$headers.Add("Authorization", "Bearer $apiKey")
$response = Invoke-WebRequest -Uri $searchUrl -Method GET -Headers $headers -UseBasicParsing
$data = $response | ConvertFrom-Json
if($data.total -eq 1) {
#Target exists
}
elseif($data.total -ge 2) {
#Found multiple matching targets...
}
else{
#Target does not exist
}
When creating or updating assets, it is important to note that it may be difficult to construct JSON payloads in PowerShell due to special characters altering your payload. This does not pertain to GET requests, since they do not require JSON payloads. To ensure proper formatting and handling of special characters, it is important to include escape characters in your PowerShell code. In my specific case, I successfully formatted my JSON payload through the usage of string formatting techniques and appropriate bracket escaping.
Below is an example snippet of how I formatted my JSON payload.
$jsonPayload = '{{"name":"{0}",
"model_number":"{1}",
"category_id":{2},
"manufacturer_id":{3},
"fieldset_id":4}}' -f $pcinfo.'Model Name', $pcinfo.'Model Number', $categoryID, $manufacturerId
Obviously, the key-value pairs in your payload will differ from this example due to variation in database field ID values. Each API has its own specific data model and identifiers that need to be used in the payload. As always, refer to the API documentation to obtain accurate database field ID values to construct a valid payload.
It is important to parse and transform the data before sending it the API, ensuring that it aligns with the expected format and uses appropriate database ID values where necessary. This step helps maintain data integrity and ensures that the API can successfully process the data.
To illustrate, in the case when selecting a model for an asset, SnipeIT requires models to be identified by their database ID number, NOT their string value.
To begin the process of retrieving the respective model database ID number, we start by first querying the relevant system to obtain the un-parsed base model information. We can then query the database for that base model information to verify the existence of the model. If the database query returns a single match, in most cases it indicates the correct identification of the target model. If the query returns multiple values, it necessitates further processing or manual selection of the appropriate model. If no values are returned, it signifies that the model has not yet been created within the system.
In situations where additional verification is deemed necessary, we can further parse the server response to validate that the model name from the respective system aligns with the model name inside of the database.
By comparing the name and model number from the server with the expected name and model number, we can ensure data consistency and confirm association.
Preliminary Target Procedures
Obtain target information from respective client.
Query the database to see if the target exists.
Check the return payload from the server.
If the server returns one object, you most likely have identified the correct target. In the case that further validation is needed, RegEx can be used to verify that the values match. To illustrate in pseudocode: $system.SerialNumber -like $data.rows.SerialNumber
If the server returns multiple objects, further parsing is required. In most cases, user intervention is required in order to to select the appropriate target.
If the server returns no objects, the target does not yet exist in the database. Create it in the database and utilize the new primary ID for that object.
This process of preliminary querying the database to verify the existence of a target will be a recurring theme throughout this project. By understanding this code logic, we can adapt it accordingly to similar operations in different parts of the project.
Once we have accurately identified the proper model ID and thoroughly verified the accuracy of all information in the payload; we can proceed with sending a POST or PUT request to the server to either create or update an existing target. In SnipeIT’s case the process looks like this:
#Created JSON payload
$jsonPayload = '{"_snipeit_identifier_tag":"ID0001",
"_snipeit_mac_address_1":"REDACTED",
"_snipeit_usc_tag_2":"REDACTED",
"name":"REDACTED",
"_snipeit_tag_10":"REDACTED",
"_snipeit_os_13":"Windows 11",
"_snipeit_backup_14":"None",
"_snipeit_data_classification_40":"REDACTED"}'
$headers = @{}
$headers.Add("Accept", "application/json")
$headers.Add("Content-Type", "application/json")
$headers.Add("Authorization", "Bearer $apiKey")
$response = Invoke-WebRequest -Uri 'https://develop.snipeitapp.com/api/v1/hardware' -Method POST -Headers $headers -ContentType 'application/json' -Body $jsonPayload -UseBasicParsing
$data = $response | ConvertFrom-Json
if($data.status -like "ERROR") {
Write-Warning "Unable to CREATE asset in SnipeIT. API returned an error."
$var = $data.messages | Get-Member
$errormsg = ""
for($i = 0; $i -le $var.count - 1; $i++) {
if($var[$i].MemberType -like "NoteProperty") {
$errormsg += $data.messages.($var[$i].Name)
$errormsg += " "
}
}
Exit
}
To verify the success of a POST/PUT request to the server, we can examine the response variable of the HTTP request. Typically, these response variables will include the status code, where a status code of 200 indicates a successful operation, while other status codes indicate various types of errors or issues.
You may have noticed in the above snippet, in the event of an error, the program is designed to specifically parse and decipher the error message contained within the response variable, thus enabling effective error handling and subsequent action.
By examining the status code within our response variable, we can easily account for and handle errors.
III - User and Location Signage
Most asset management solutions provide a procedure for setting the location of an asset and enabling the functionality to check out assets to users. These features allow IT Administrators to more effectively track and manage the movement of an asset within an organization. IT Administrators can also track which assets are assigned to which users. SnipeIT uses the term check out to mean an asset is assigned to a user.
SnipeIT offers LDAP SYNC functionality which enables organizations to integrate their LDAP/AD server, and their asset management system. This includes the automatic synchronization of data, as well as other relevant information to SnipeIT. LDAP Sync can be configured by navigating to the LDAP settings section in the SnipeIT administration panel.
While integrating LDAP allows for the creation and update of users, locations must be created manually. It is recommended to create location objects in SnipeIT with unique identifiers in order to facilitate easy identification of target rooms through the API. This unique naming convention helps streamline the retrieval process of room data through the API as it avoids potential conflicts.
To illustrate, we can utilize the following naming scheme for mostly unique location names:
Syntax:
[BuildingAbbreviation]-[Room Number]
For example, if we had the buildings:
Empire State Building
World Trade Center
Chrysler Building
The Dakota
Resulting Unique Identifiers:
Empire State Building Room BC01 - EMPR-BC01
World Trade Center Room 112 - WRTR-112
Chrysler Building Room 484A - CRSL-484A
The Dakota Room 233C - NDAK-233
etc...
As a result of this naming convention, querying the location table in the SnipeIT database for a specific room number typically returns only one result due to the uniqueness of the location name. This eliminates the need for additional parsing or processing.
However, there will be some cases where the API response returns multiple results due to the inherent likeness of room numbers. These scenarios can be solved by presenting the user with a list of potential matching locations to select from. This interactive approach ensures accuracy and allows for human intervention to resolve any potential issue.
As for network users, querying the database becomes significantly easier as a result of LDAP/AD SYNC configuration. Through this integration, network usernames are unique identifiers, which facilitates straightforward querying and identification of network IDs. While automation can streamline most of this process, it is important to note that manual human intervention is still required in most cases where the system matches a query with a substring of another network ID, resulting in multiple matching network IDs. As a result, this leads to potential ambiguity in the response and additional parsing is required to accurately identify the intended network ID.
To achieve full automation one potential approach could be to loop through the user array returned by the API and perform exact string matching. By iterating through each record, the program can compare the queried username with usernames in the response to find an EXACT match. Once found, this can be returned in confidence.
During this process it is important to note the ability to account for certain errors. To illustrate in SnipeIT, an asset can only be checked out to one individual location or user. If the API attempts to checkout an asset while it is already checked out, it will throw the following error.
#Attempting to checkout an asset that is already checked out to a user with the API.
$jsonPayload = '{{"id":"{0}",
"status_id":"4",
"checkout_to_type":"user",
"assigned_user":"{1}"}}' -f "$primaryID", "$userID"
$postURL = 'https://develop.snipeitapp.com/api/v1/hardware/1/checkout'
$headers = @{}
$headers.Add("Accept", "application/json")
$headers.Add("Content-Type", "application/json")
$headers.Add("Authorization", "Bearer $apiKey")
$response = Invoke-WebRequest -Uri $postURL -Method POST -Headers $headers -ContentType 'application/json' -Body $jsonPayload -UseBasicParsing
$data = $response | ConvertFrom-Json
OUTPUT:
$data
status messages payload
------ -------- -------
error That asset is not available for checkout! @{asset=1}
By incorporating informative error messages, we can easily identify and account for errors encountered during this process. One approach to solve this case is by creating a function that simply checks in the asset. Once you encounter this error where an asset is not available for checkout, we can call this function to first check-in the asset, making it available to be checked-out. This way the asset will be correctly processed, and the error can be resolved. This can all be done in the background without being displayed to the user, allowing for smooth execution of the asset check-in/check-out process.
IV - Error Handling
Error handling plays a critical role in the development process as it contributes to a seamless user experience and facilitates the identification and resolution of unintended bugs and errors. By implementing robust error handling and reporting mechanisms, we can address situations that may arise during execution.
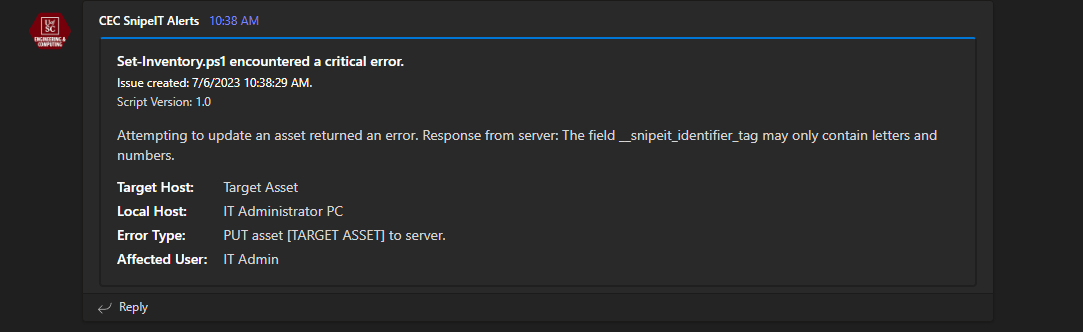
One effective approach for error reporting is the implementation of an autonomous bug reporting system. This feature enables the program to automatically generate and send bug reports to developers whenever critical errors occur during execution. This enhances overall stability and reliability of the software and enables you to identify and resolve critical bugs that may affect user experience. During this process we as a developer have the flexibility to determine what information is relevant to include in the bug report.
The medium through which you choose to send bug reports can vary depending on your preferred communication channels.
Below is an example of an error report sent through Microsoft Teams API. This can be done by creating a Microsoft Teams Channel and configuring an incoming webhook.
V - GUI Creation
To conclude the development process, we utilize PowerShell forms to create a graphical user interface (GUI) for our PowerShell program. This step enhances the user experience and simplifies interaction with the program. This empowers users unfamiliar with PowerShell and execution policy to utilize the program’s capabilities. This phase revolves around developing a graphical user interface and integrating it with our existing functions to deliver a quality user experience.
Creating the interface includes designing visually appealing and intuitive windows, and adding controls and elements that align with the program’s purpose and functionality. Before diving into logic, it is important to understand the fundamental principles of PowerShell forms.
Fundamentals of PowerShell Forms
1. Form Object - an object that represents the graphical user interface object that PowerShell displays. This object is part of the .NET framework that needs to be imported in order to be used. Through this object's attributes, you can add controls, customize size, position, title, appearance, and more.
#Import #.NET framework dependencies needed to initialize PowerShell Forms.
[Net.ServicePointManager]::SecurityProtocol = [Net.SecurityProtocolType]::Tls12
Add-Type -AssemblyName System.Windows.Forms, System.Drawing, PresentationCore, PresentationFramework
$main = New-Object System.Windows.Forms.Form
$main.ClientSize = '400,450'
$main.StartPosition = 'CenterScreen'
$main.TopMost = $true
2. Controls - controls in PowerShell forms refer to the individual elements or objects that you can add to a PowerShell from to build the GUI. They are the building blocks that allow users to interact with the forms and provide input or receive input.
A few example of controls available in PowerShell forms are displayed on the left. By adding and configuring these controls within a form, you can create a GUI that allows users to interact with your PowerShell scripts in a more user-friendly manner.
Common Controls
Labels: Used to display text.
Buttons: Used to provide a clickable button that triggers an action when clicked by the user.
Textboxes: Used to allow users to input text or data.
Comboboxes: Used to allow users to select an option from a dropdown box.
3. Layout Design - The recommended approach to positioning elements in forms is absolute positioning. This allows you to position objects based off of a grid-like system. This is done with an X and Y coordinate system with X denoting horizontal movement, and Y denoting vertical movement.
#Place the submit button 50 units to the right and 50 units down from the origin.
$submitButton.Location = New-Object System.Drawing.Point(50, 50)
Common Methods
Add_Click: Attaches a function, script, or event handler to the control's click event.
ShowDialog: Used on the main form object, is used to display the form as a dialog box meaning the user must interact with the dialog before returning to the main form or application, This is primarily used for when input is required.
Show: Used on the main form object, is used to display the form as a modeless window, allowing the user to interact with the form while still having access to other elements of the application.
Add: Used to add a control to a form.
AddRange: Used to add an array of controls to a form.
Used to release resources used by the form object. Cleans up and frees system resources when the form is closed.
Common Attributes
Text: Sets the text content of the control.
ForeColor: Sets the foreground color of the control.
BackColor: Sets the background color of the control.
Location: Sets the location of the control object using an (X, Y) based coordinate system.
TextAlign: Sets the alignment of the text. Valid values can be found here.
StartPosition: Allows you to select where the form will initially display. Valid values can be found here.
BorderStyle: Allows you to add a border to your control. Is especially useful for debugging purposes to see the margins of your control. Valid values can be found here.
Width: Allows you to adjust the width of your control in pixels.
Height: Allows you to adjust the height of your control in pixels.
Note that initialization of an object is not enough to display it on the form object. To make the control visible, it must first be added to the form object using Add or AddRange. An example of adding controls cana be seen below.
function Init-Company{
[CmdletBinding()]
Param()
Process {
$main = New-Object System.Windows.Forms.Form
$main.ClientSize = '340, 260'
$main.StartPosition = 'CenterScreen'
$main.TopMost = $true
$main.Text = $progt
#Add descriptive controls...
$opts = @("option1" "option2")
$companytypefield = New-Object System.Windows.Forms.ComboBox
$companytypefield.Location = New-Object System.Drawing.Point(60, 140)
$companytypefield.Width = 230
$companytypefield.Font = 'Arial, 8'
$opts | ForEach-Object {[void] $companytypefield.Items.Add(($_))}
$select = New-Object System.Windows.Forms.Button
$select.BackColor = "#012456"
$select.Text = 'Select'
$select.Location = New-Object System.Drawing.Point(130, 190)
$select.Font = 'Arial, 10'
$select.ForeColor = "#FFFFFF"
$select.Add_Click({Select-CompanyType})
$main.Controls.AddRange(@(#...add all initialized controls, $companytypefield, $select))
$main.ShowDialog()
return $companyType
}
}
With a solid understanding of the fundamentals, we can now progress to code workflow. Code workflow generally follows a structured process. It begins by designing and implementing an intuitive graphical user interface that provides a user-friendly experience. This involves creating the main necessary form object and implementing controls and layouts to enable interaction with the program.
Once the GUI design is complete, the next step is to integrate it with our previously designed functionality. This involves connection controls to the appropriate functions and methods that handle desired functionality; ensuring that user actions trigger the appropriate corresponding code execution.
In addition, it is crucial to conduct thorough unit-testing to ensure that the interface behaves as expected. Unit testing involves isolating the interface in question and exploring different cases to cover ALL different scenarios of the program. By executing these tests, we can verify that the interfaces function correctly, and they produce the desired outcome.
To illustrate this process, let’s explore the integration of a sample interface along with its respective function. This will be a practical demonstration of how the GUI and its functionality can be integrated to deliver a cohesive experience.
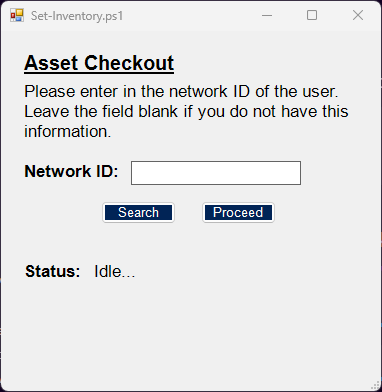
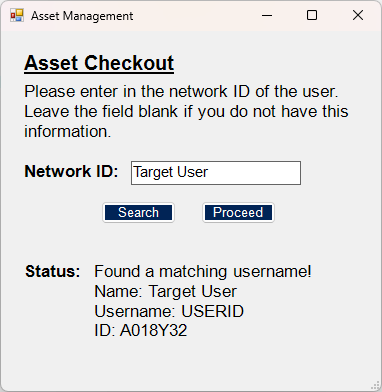
In this scenario we are going to design an interface that allows us to query and select a network user to check an asset out to. The program will query SnipeIT’s LDAP directory for user input, and return a user ID.
An example of the interface is shown on the right. The primary object is to craft an interface that is clear, concise, and above all intuitive. The interface exhibits a prominent emphasis on legibility, placement of controls, comprehensive descriptions, as well as buttons that unambiguously convey their intended functionality. It is important to note that although this interface exhibits good characteristics, there is always room for improvement. The optimal approach to interface design involves conducting extensive user testing to gather feedback. By subjecting the interface to rigorous testing to targeted users, we can identify areas of improvement.
Integrating the functionality of the program with the interface requires a clear understanding of the function. It entails determining the necessary parameters to be collected, any user selections that need to be made, and considering the different edge cases that may occur.
To illustrate this integration process, in this scenario we are attempting to query the network ID of an LDAP user from SnipeIT for asset checkout. In this case the only parameter we require from the user to continue is the network ID to be queried.
To connect this functionality with the interface, we first need a text input field so the user can enter in the network ID. Once queried we need to display to the user the response from the server and allow them to review and confirm selection of the target user. User confirmation is required to ensure the accuracy the program's selection, eliminating ambiguity and the possibility of errors in the database. Note how the program is constantly communicating with the user, notifying them with information regarding ongoing operations.
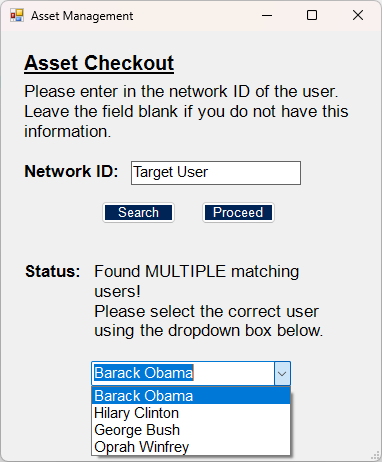
During integration of this functionality, it is important to anticipate and account for all possible scenarios or cases that the user may encounter. To conduct this, it is important to conduct through testing to identify potential errors and edge cases. By anticipating these scenarios, we can implement appropriate error handling, validation mechanisms, and user prompts to guide the user through the process.
For example, if a user enters a network query that returns no results, the interface should inform the user accordingly. Other examples include input validation to ensure that the user cannot submit a null value. In this scenario, we account for the situation where the network ID returns multiple matching results. In this case, we can display a dropdown box and get the user to select the targeted end user.
Once we complete the design and integration of our interface, we can proceed to compile the program into a compact and portable executable file, ensuring its ease of use and distribution. We can compile our program with the user of a custom PowerShell module called PS2EXE which enables us to convert our PowerShell script into an executable file. To install the custom module, you can use the following code snippet:
#Install custom module
Install-Module PS2EXE
#Compile PowerShell script to executable
Invoke-PS2EXE -inputFile [PATH TO .PS1] -outputFile [PATH TO OUTPUT .EXE] -requireAdmin -noConsole
VI - Management Addons
After completing the main logic for the program, we can augment the main code and produce useful supporting scripts tailored to our needs and requirements. By expanding its capabilities and addressing specific use cases, we can create a comprehensive solution that meets the needs of IT Administrators. These supplementary scripts offer a diverse range of practical functionalities such as the ability to query assets directly from the command line, or automation of assets for entire computer labs. The ability to query assets directly from the command line empowers users to retrieve specific assets information swiftly and conveniently, eliminating the need for manual navigation through the web interface. Automating asset management for computer labs simplifies the management process of computer labs, eliminates the possibility of human error, and optimizes productivity.
These suggestions are just a small sample of the possibilities that can be achieved by utilizing PowerShell and SnipeIT API. The flexibility and power of these tools allow for endless customization and automation options, tailored to your specific needs.
It is important to note that while you may be able to quickly adapt code from the main program to create supplementary scripts, it is important to exercise caution when modifying code from the main program. Attention must be given to ensure that any alteration aligns with the intended functionality of the supporting scripts while maintaining the integrity of the overall program.
VII - Troubleshooting
Debugging in programming is a systematic process of tracing errors back to their origins. That process is no different in this case. In most scenarios, by following the error back to the root you can identify and resolve the issue.
When I say, “follow the error back to the root”, it entails an investigative approach to identify the underlying causes of a program’s errors or issues. By tracing the path of the error, you uncover the fundamental source or root code responsible for the observed behaviors. This can involve scrutinizing error messages, reviewing log messages, or narrowing down the potential triggers of this error.
Resolution Issues in PowerShell forms
Prerequisites
• Initialization of a [System.Windows.MessageBox] object in to-be-compiled script.
• Compilation of a PowerShell script using PS2EXE module
Description
System.Windows.MessageBox may be used in PowerShell scripts when you want to display pop up message boxes to the user. one of the weird issues I've experienced is when working with PowerShell forms and PS2EXE, initialization of a [System.Windows.MessageBox] causes the form to fail to scale to proper size on 4K screens.
To illustrate, if you initialize a PowerShell form on a 1080p screen it displays normally. On 4k screens it also displays normally, however this is because PowerShell scales the form up since 4k screens have more pixels. Initialization of this message box object will cause the PowerShell to fail to scale up the form, incorrectly displaying the form. The result is an unusable and malformed form.
Solution
Not using [System.Windows.MessageBox] will solve the resolution issue. Simply use ComObject Wscript.Shell to display your pop up messages instead.
#This produces a resolution issue on 4k Screens
Add-Type -AssemblyName System.Windows.Forms, System.Drawing, PresentationCore, PresentationFramework
[System.Windows.MessageBox]::Show("Message", 'Title', 0, 16) > $null
#Fix
$WSHELL = New-Object -ComObject Wscript.Shell
$WSHELL.Popup("Description",0,"Title",0x0 + 0x10) > $null
PowerShell by default imposes fairly stringent security measures and requirements for accepting valid websites. To be valid, websites must possess valid TLS/SSL certificates. When you attempt to access a website with outdated or invalid certificates, you may encounter the following errors:
Invoke-WebRequest : The request was aborted: Could not create SSL/TLS secure channel.
Invoke-WebRequest : The underlying connection was closed: Could not establish trust relationship for the SSL/TLS secure channel.
Solution
While it is generally recommended to address the SSL/TLS certificate issue by updating your web server with a valid certificate, there are situations where bypassing the problem temporarily may be necessary. Here are two methods in which can be used to bypass the SSL/TLS certificate validation.
The first method is to use -SkipCertificateCheck handle built into Invoke-WebRequest. This handle allows you to bypass certificate validation for the specific command without disabling it globally. Note however, this feature is only available in PowerShell versions 6.0.0+. To check your version of PowerShell you can check the automatic variable, $PSVersionTable
#Check Version
$PSVersionTable
Name Value
---- -----
PSVersion 5.1.22621.1778
PSEdition Desktop
PSCompatibleVersions {1.0, 2.0, 3.0, 4.0...}
BuildVersion 10.0.22621.1778
CLRVersion 4.0.30319.42000
WSManStackVersion 3.0
PSRemotingProtocolVersion 2.3
SerializationVersion 1.1.0.1
#If Version is 6.0.0+
$request = Invoke-WebRequest -Uri $url -Headers $headers -SkipCertificateCheck
For those using PowerShell versions prior to 6, the alternative method to bypass SSL/TLS certificate validation is as follows. Simply place this following code snippet in the header of your script. Please note that this is a terminal-wide setting so your terminal will continue to trust all certificates, even after your script has completed running. In order to revert to default settings, simply re-open a terminal where you have not run this code snippet yet.
$code= @"
using System.Net;
using System.Security.Cryptography.X509Certificates;
public class TrustAllCertsPolicy : ICertificatePolicy {
    public bool CheckValidationResult(ServicePoint srvPoint, X509Certificate certificate, WebRequest request, int certificateProblem) {
        return true;
    }
}
"@
Add-Type -TypeDefinition $code -Language CSharp
[System.Net.ServicePointManager]::CertificatePolicy = New-Object TrustAllCertsPolicy
[Net.ServicePointManager]::SecurityProtocol = [Net.SecurityProtocolType]::Tls12
Invoke-WebRequest: IE Engine not available response cannot be parsed
This issue with IWR command arises from the deprecation of the Internet Explorer engine. In the latest operating systems, all Internet Explorer requests are redirected to Microsoft Edge. As a result, since IWR utilizes IE COM API to parse the document, it throws the error that the engine is not available. Fortunately, Microsoft has a handle built into IWR that solves our issues, -UseBasicParsing. This command simply uses basic RegEx parsing instead of calling on IE COM API.
Solution
Use -UseBasicParsing handle.
Invoke-WebRequest -Uri $url -Headers $headers -UseBasicParsing
Conclusion
In conclusion, the utilization of PowerShell alongside SnipeIT API provides a powerful and robust platform for asset management and automation. Throughout this post, we’ve explored various aspects of integration from data aggregation, asset creation, creating a graphical user interface, and compilation. By continuously seeking opportunities for improvement, we can eliminate repetitive manual tasks, enhance performance, and learn new technologies.
Acknowledgements
I am deeply grateful and indebted to Brian Hull for providing me with the opportunity to work on this project. His guidance and support on program design and strategies have been ESSENTIAL throughout this project. Under his tutelage I have experienced immense personal and professional growth, and I am truly honored to have had the privilege of working under his mentorship. Thank you Brian, for your invaluable contribution to my professional growth and success.
Cameron McDuffie holds a place in my life as one of my closest friends, and strongest advocates. From helping me secure this job to CONSTANTLY offering me encouragement when I doubted myself, Cameron has consistently supported me. He has been a tremendous source of inspiration and has shaped me into the person I am today. Thanks Cameron, for always encouraging and being there for me. You are a role model in my life and have inspired me to constantly better and improve myself.